Welcome to our HTML Tables Tutorial with Examples! 🎉 In this tutorial, we’ll guide you through the essentials of creating and styling tables in HTML, from basic structure to advanced designs.
You’ll learn how to make your tables responsive, accessible, and visually appealing, with practical and visual examples along the way. Let’s dive into mastering HTML tables and take your web design skills to the next level! ✨
Table of Contents
1. Introduction to HTML Tables
What is an HTML Table? 🗃️
An HTML table is a structured presentation of data on a webpage, along rows and columns. It is great when one wants to present a list of information, comparisons, or any data that can easily be presented in a grid. Think about this: a table as a grid where every box can carry some information!
Brief History of HTML Tables in Web Design
HTML tables have been around as long as the internet itself. They were primarily used for layout in the early development years of the web, helping designers create complex web pages. However, over time, their primary function shifted back to displaying data, as CSS became the preferred method for layout.
Why Use Tables in Modern Web Development? (Pros and Cons)
Pros:
- Structured Data: Perfect for displaying data in an organized way.
- Easy to Read: Rows and columns help users quickly scan for information.
- Semantic Meaning: Tables provide a clear way to present tabular data.
Cons:
- Do Not Use for Layout: Do not use tables for page layout—CSS will do it better!
- Responsive Issues: Tables can be a bit of a headache on small screens, but we will explore making them responsive shortly. 📱
Where Not to Use HTML Tables (Avoiding Layout-Based Tables) 🚫
Don’t use tables for layouts, such as creating entire web page structures. Instead, use CSS to create a layout. That way, you keep your HTML clean and your data structured correctly!
2. Anatomy of an HTML Table
Understanding the Structure: Table, Rows, and Cells
An HTML table consists of three main components:
- Table: The entire table structure.
- Rows: Lines on which data stretches horizontally.
- Cells: Individual boxes within a row where data is displayed.
Basic HTML Table Syntax (Step-by-Step Example) 📋
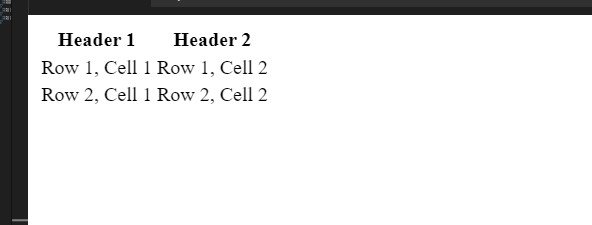
Here’s a simple example to get started with tables:
<table>
    <tr>
        <th>Header 1</th>
        <th>Header 2</th>
    </tr>
    <tr>
        <td>Row 1, Cell 1</td>
        <td>Row 1, Cell 2</td>
    </tr>
    <tr>
        <td>Row 2, Cell 1</td>
        <td>Row 2, Cell 2</td>
    </tr>
</table>
Output:
Breaking Down the Code: Table Elements Explained
<table>: The container for the table.<tr>: Defines a table row.<th>: Defines a header cell (bold and centered by default).<td>: Defines a standard data cell.
I know the above table looks quite bad, but worry not, we will make it beautiful, let’s continue.
3. Creating Table Rows and Cells
How to Define Rows with <tr> (Table Row) 📅
To create a new row in your table, simply use the <tr> tag. For example:
<tr>
    <td>Data Cell 1</td>
    <td>Data Cell 2</td>
</tr>
Using <td> to Create Data Cells
<tr>
    <td>Banana</td>
    <td>Yellow</td>
</tr>
Using <th> to Create Header Cells
<tr>
    <th>Fruit</th>
    <th>Color</th>
</tr>
Real-World Examples of Rows and Cells 🌍
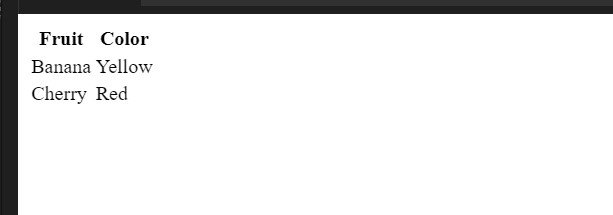
Here’s a real-world example of a simple fruit table:
<table>
    <tr>
        <th>Fruit</th>
        <th>Color</th>
    </tr>
    <tr>
        <td>Banana</td>
        <td>Yellow</td>
    </tr>
    <tr>
        <td>Cherry</td>
        <td>Red</td>
    </tr>
</table>
Output:
4. Understanding Table Headers and Captions
Horizontal and Vertical Headers (<th>)
You can use <th> to create horizontal headers (as shown in previous examples). For vertical headers, define the first cell in each row as a <th> element:
<table>
    <tr>
      <th>Day</th>
      <th>Breakfast</th>
      <th>Lunch</th>
      <th>Dinner</th>
    </tr>
    <tr>
      <th>Monday</th>
      <td>Pancakes</td>
      <td>Salad</td>
      <td>Pizza</td>
    </tr>
    <tr>
      <th>Tuesday</th>
      <td>Omelette</td>
      <td>Soup</td>
      <td>Pasta</td>
    </tr>
    <tr>
      <th>Wednesday</th>
      <td>Cereal</td>
      <td>Sandwich</td>
      <td>Stir-fry</td>
    </tr>
  </table>
Output:

We will learn soon about Table Borders.
Creating Complex Table Headers (Multi-Level Headers)
For more complex headers, you can nest headers. Here’s how to create multi-level headers:
<table>
    <tr>
        <th colspan="2">Fruits</th>
        <th>Vegetables</th>
    </tr>
    <tr>
        <th>Fruit Name</th>
        <th>Color</th>
        <th>Veg Name</th>
    </tr>
    <tr>
        <td>Banana</td>
        <td>Yellow</td>
        <td>Carrot</td>
    </tr>
</table>


<!--Some simple CSS to design it-->
<style>
  table {
    width: 50%;
    border-collapse: collapse;
    margin: 20px 0;
    font-family: Arial, sans-serif;
  }

  th, td {
    border: 1px solid black;
    padding: 8px;
    text-align: center;
  }

  th {
    background-color: #f2f2f2;
  }

  tr:nth-child(even) {
    background-color: #f9f9f9;
  }

  tr:hover {
    background-color: #e0e0e0;
  }
</style>
Output:

Adding a Caption (<caption>) to Enhance Table Clarity 📝
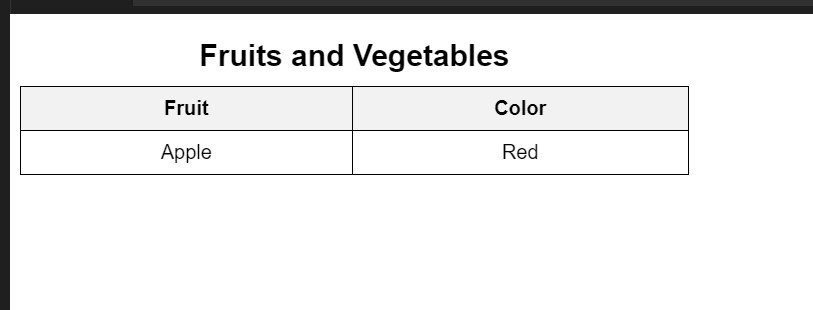
You can provide a title for your table using the <caption> tag. Here’s how:
<table>
    <caption>Fruits and Vegetables</caption>
    <tr>
        <th>Fruit</th>
        <th>Color</th>
    </tr>
    <tr>
        <td>Apple</td>
        <td>Red</td>
    </tr>
</table>


<style>
  table {
    width: 50%;
    border-collapse: collapse;
    margin: 20px 0;
    font-family: Arial, sans-serif;
  }

  caption {
    font-size: 1.5em;
    margin-bottom: 10px;
    font-weight: bold;
    text-align: center;
  }

  th, td {
    border: 1px solid black;
    padding: 8px;
    text-align: center;
  }

  th {
    background-color: #f2f2f2;
  }

  tr:nth-child(even) {
    background-color: #f9f9f9;
  }

  tr:hover {
    background-color: #e0e0e0;
  }
</style>
Output:
5. HTML Table Borders: From Basic to Advanced Styling
Adding Simple Borders Using CSS
To add borders to your table, use CSS like this:
<style>
table {
    border-collapse: collapse; /* Merges borders */
    width: 100%; /* Makes table full-width */
}

th, td {
    border: 1px solid black; /* Adds border */
    padding: 8px; /* Adds space inside cells */
}
</style>


<table>
  <tr>
      <th>Fruit</th>
      <th>Color</th>
  </tr>
  <tr>
      <td>Apple</td>
      <td>Red</td>
  </tr>
  <tr>
      <td>Banana</td>
      <td>Yellow</td>
  </tr>
  <tr>
      <td>Grapes</td>
      <td>Green</td>
  </tr>
</table>
Output:

Border Collapsing: Combining Borders for Clean Layouts
The border-collapse property combines adjacent borders into a single border. This gives a cleaner look to your table.
We have used this property in our above example.
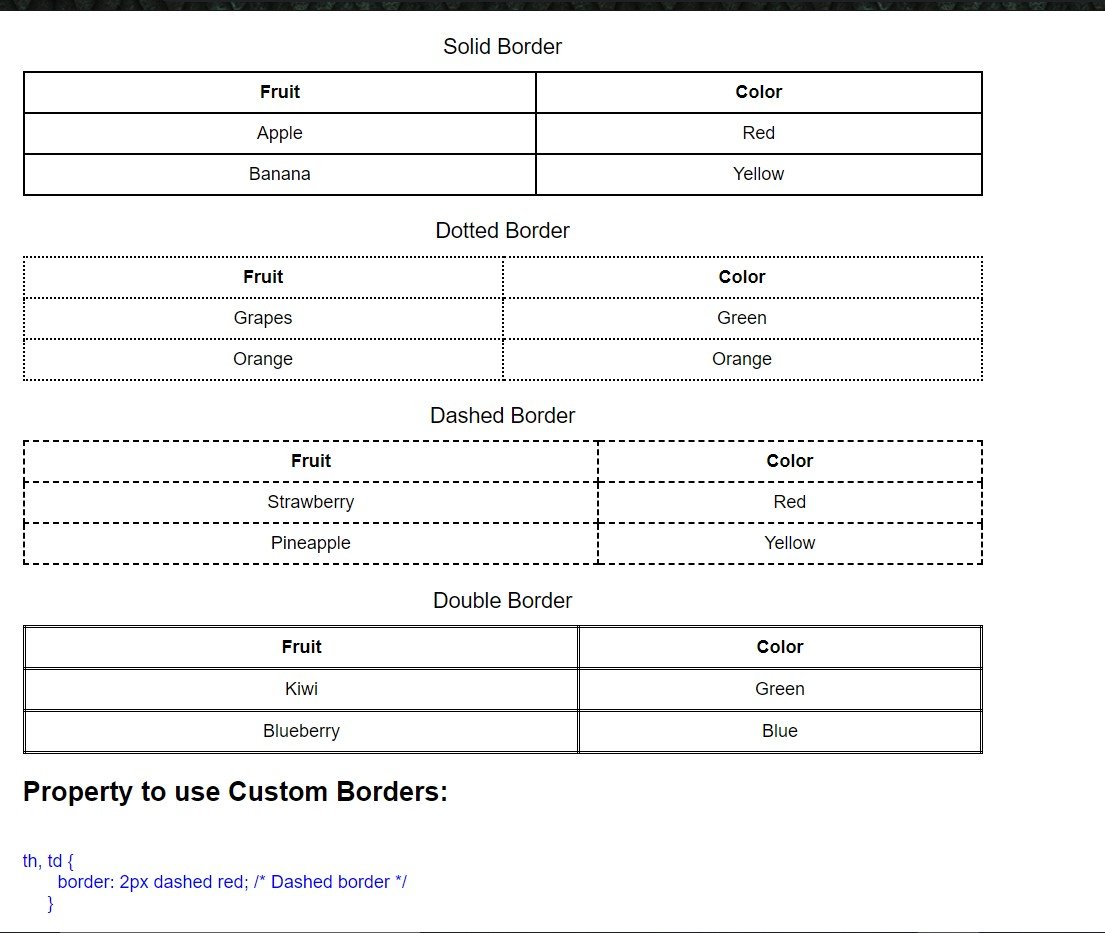
Customizing Borders: Dotted, Dashed, and Double Lines 🎨
Here’s a list of various custom border styles you can use in CSS:
- solid
- dotted
- dashed
- double
- groove
- ridge
- inset
- outset
- none
- hidden
Here is examples of some custom borders.
Creating Rounded Borders for a Sleeker Look
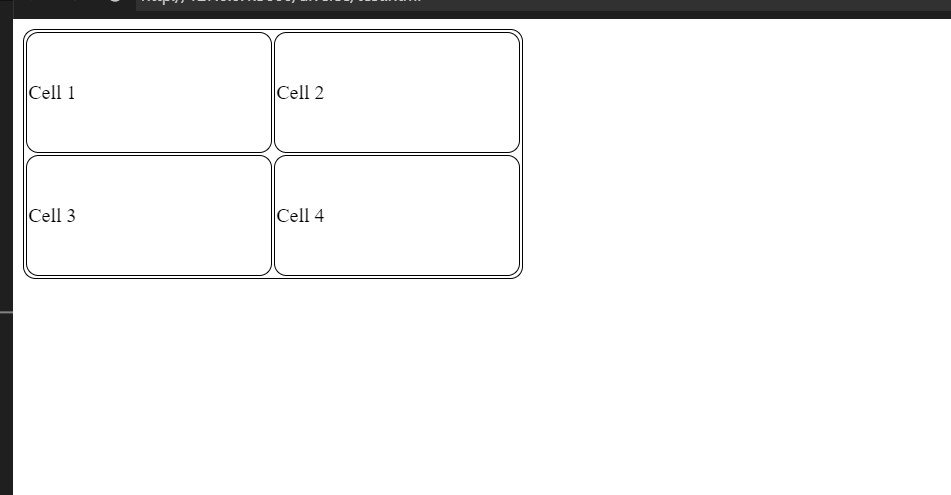
To create rounded corners, use the border-radius property:
<style>
table {
  border: 1px solid black;
  border-radius: 10px; /* Rounded corners */
  overflow: hidden; /* Ensures rounded corners appear */
  height: 200px;
  width: 400px;
}

th, td {
  border: 1px solid black;
  border-radius: 10px; /* Rounded corners for cells */
}
</style>


<table>
  <tr>
    <td>Cell 1</td>
    <td>Cell 2</td>
  </tr>
  <tr>
    <td>Cell 3</td>
    <td>Cell 4</td>
  </tr>
</table>
Output:
Using Border-Color to Add Style ✨
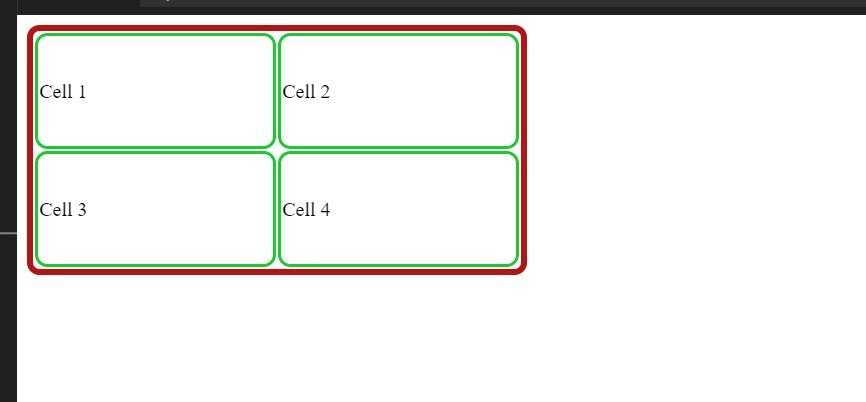
You can change the color of your table borders using border-color:
You need to change the color(black) property in border: 1px solid black; and you can also use border-color property separately.
6. Working with Table Dimensions
How to Set Table Widths (Fixed and Responsive)
You can set fixed or responsive widths for your table:
table {
    width: 80%; /* Fixed width */
}
To make it responsive, use percentages or media queries.
Adjusting Column Width for Consistency
Set widths for individual columns like this:
td:nth-child(1) {
    width: 50%; /* First column takes 50% */
}
Controlling Table Height for Vertical Alignment
You can control the height of your table with:
td {
    height: 50px; /* Fixed height */
}
Ensuring Responsive Behavior for Smaller Screens 📱
You can use media queries to ensure tables look good on small screens:
@media screen and (max-width: 600px) {
    table {
        width: 100%; /* Full width on small screens */
    }
}
7. Table Padding and Spacing
The Difference Between Cell Padding and Cell Spacing
- Padding is the space inside a cell, between the cell border and its content.
- Spacing (now replaced by
border-spacing) is the space between cells.
Adjusting Padding for Content Comfort 🛋️
Use the padding property to adjust cell padding:
td {
    padding: 10px; /* Adds space inside cells */
}
Reducing or Increasing Space Between Cells 📏
To manage spacing, you can set border-spacing:
table {
    border-spacing: 5px; /* Space between cells */
}
Note:
This is just the first part of the HTML Tables. I will be uploading the next part in the upcoming days.
Also Read:
- HTML Interactive Elements: The Ultimate Guide to Elevating User Experience
- Master HTML Basics: 7 Essential Tips for Perfect Web Design
- You can also read about tables on this site.
8. Mastering Colspan and Rowspan 🌟
How to Merge Cells Horizontally with Colspan (<td colspan>) ➡️
Colspan is your best friend when you want to merge cells across a row! This is useful when you want to create a wider cell that spans multiple columns. Just add the colspan attribute to the <td> tag and tell it how many columns you want it to cover!
<table border="1">
  <tr>
    <td colspan="2">I'm a big cell! 🎉</td>
  </tr>
  <tr>
    <td>Cell 1</td>
    <td>Cell 2</td>
  </tr>
</table>
This example shows a cell that takes up two columns! Super handy, right? 😄
Merging Cells Vertically with Rowspan (<td rowspan>) ⬆️
Rowspan is like the superhero version of colspan! 🦸♂️ It lets you merge cells vertically across multiple rows. You just need to use the rowspan attribute in the same way.
<table border="1">
  <tr>
    <td rowspan="2">I span two rows! 🚀</td>
    <td>Cell 1</td>
  </tr>
  <tr>
    <td>Cell 2</td>
  </tr>
</table>
Here, our first cell is spanning two rows! Just like magic! 🎩✨
When and Why to Use Colspan and Rowspan 🤔
- Colspan: When combining cells horizontally for headings or to group related data. This helps in making your table look cleaner and more organized!
- Rowspan: Use it when you want to emphasize a data point that stretches across multiple rows, like a category or section.
Real-Life Use Cases (Merging Cells in Calendars, Timetables) 📅📊
- Calendars: Use colspan to create a title for a week or month.
- Timetables: Use rowspan for classes that happen at the same time on different days.
9. Essential HTML Table Tags and Structure 📋
A Complete Guide to Table Tags: <table>, <thead>, <tbody>, <tfoot> 🏷️
<table>: This tag is the foundation of your table. It wraps everything up!<thead>: Use this tag for your table headers. It helps in styling and makes it easier to manage your table!<tbody>: This tag contains your main content. It separates the body from the headers and footers.<tfoot>: Use this for the footer section, like totals or notes. It helps keep everything organized!
Organizing Tables Using <thead> for Headers and <tfoot> for Footers 🔝
Here’s how you might set it up:
<table border="1">
  <thead>
    <tr>
      <th>Name</th>
      <th>Age</th>
    </tr>
  </thead>
  <tbody>
    <tr>
      <td>John</td>
      <td>30</td>
    </tr>
  </tbody>
  <tfoot>
    <tr>
      <td colspan="2">Total People: 1</td>
    </tr>
  </tfoot>
</table>
This structure keeps your data nice and tidy! 🧹✨
Using <tbody> to Separate Main Content from Headers/Footers 📂
The <tbody> tag is great for grouping your main data. This helps in cases where you want to style or manipulate the data separately from the header or footer.
Best Practices for Structuring Complex Tables 🛠️
- Always use
<thead>,<tbody>, and<tfoot>for clarity and organization. - Keep headers descriptive and concise.
- Avoid overcrowding tables with too much data!
10. Grouping Columns Using <colgroup> 📊
The Purpose of <colgroup> and <col> in Tables 🧭
<colgroup>: This tag groups columns together, making it easier to apply styles to entire sections of your table!<col>: This tag is used within<colgroup>to define specific styles for the columns.
<table border="1">
  <colgroup>
    <col style="background-color: lightblue;">
    <col style="background-color: lightgreen;">
  </colgroup>
  <tr>
    <th>Name</th>
    <th>Age</th>
  </tr>
</table>
This gives each column a different color! 🎨
Applying Styles to Specific Columns with CSS 🎨
You can easily apply different styles to your grouped columns for a colorful table experience!
Hiding Columns for Better Responsiveness and Design 🚫
Sometimes, you might want to hide certain columns on smaller screens. This can be done with CSS!
@media (max-width: 600px) {
  .hide-on-small {
    display: none; /* Hides this column on small screens */
  }
}
CSS Properties for Column Grouping ⚖️
You can use CSS properties like width, background-color, and border within the <colgroup> to style your columns efficiently.
11. Styling HTML Tables for Better Visual Appeal 🌈
Adding Zebra Stripes for Alternating Row Colors 🦓
Zebra stripes make it easier to read table rows! You can achieve this effect with CSS.
tr:nth-child(even) {
  background-color: #f2f2f2; /* Light gray for even rows */
}
Hover Effects to Highlight Rows on Mouseover 🖱️
Make your table interactive! Use hover effects to highlight rows when users mouse over them.
tr:hover {
  background-color: #ddd; /* Changes color on hover */
}
Styling Table Borders, Backgrounds, and Text Alignment 🎨
Use CSS to style your table borders, set backgrounds, and align text beautifully!
th {
  border: 2px solid black;
  background-color: lightyellow;
  text-align: center;
}
Using CSS to Add Icons or Symbols Inside Tables 💡
You can use icons or symbols to enhance your table data visually. Just use HTML or CSS to add them!
<td>👍 Good</td>
Creating Aesthetic Spacing for Neat Tables 🧹
Use padding to create space within your cells, making the content look neat and tidy!
td {
  padding: 10px; /* Adds space around content */
}
12. Building Nested Tables: Tables Within Tables 🏰
Understanding Nested Tables and Their Use Cases 🧐
Nested tables can be useful for representing complex data structures. Just remember, keep them organized!
How to Place a Table Inside Another Table (Example) 🪄
<table border="1">
  <tr>
    <td>
      Main Table Cell
      <table border="1">
        <tr>
          <td>Nested Table Cell</td>
        </tr>
      </table>
    </td>
  </tr>
</table>
You can place a full table inside a cell! It’s like a table inside a table! 📦✨
Avoiding Pitfalls of Nested Tables (Overcomplicating Layouts) ⚠️
Be careful! Too many nested tables can confuse users. Use them wisely and avoid overcomplicating your designs.
Practical Applications: Complex Data Presentation 📈
Nested tables are great for presenting hierarchical data, like organizational charts or multi-level lists!
13. Making HTML Tables Responsive 📱
Importance of Responsive Tables in Modern Web Design 🌐
In today’s mobile world, responsive tables are crucial! They ensure your data is accessible on all devices.
Using CSS Media Queries for Table Responsiveness 🛠️
Media queries let you adjust your table styles based on screen size.
@media (max-width: 600px) {
  table {
    width: 100%; /* Full width on small screens */
  }
}
Wrapping Tables for Small Screens (Scroll and Collapse) 📜
On small screens, you might want to make tables scrollable instead of squished.
.table-wrapper {
  overflow-x: auto; /* Enables horizontal scrolling */
}
Alternatives to Traditional Tables for Mobile Users 📲
Consider using cards or lists for simpler data presentation on mobile devices.
14. Accessible HTML Tables: Ensuring Inclusivity 🌍
Why Accessibility Matters in Tables 🚀
Accessibility is super important! It ensures everyone, including those with disabilities, can access and understand your data.
Best Practices for Accessible Table Design 📖
- Use
<th>for header cells to make it clear what data is in each column. - Ensure that tables have captions (
<caption>) for context. - Use proper semantic HTML so that screen readers can easily interpret your tables.
Adding ARIA Roles and Attributes for Screen Readers 📢
Using ARIA (Accessible Rich Internet Applications) attributes helps improve accessibility. Here’s how:
- Add
role="table"to your<table>tag. - Use
role="row"for rows androle="cell"for individual cells.
<table role="table">
  <thead role="rowgroup">
    <tr role="row">
      <th role="columnheader">Name</th>
      <th role="columnheader">Age</th>
    </tr>
  </thead>
  <tbody role="rowgroup">
    <tr role="row">
      <td role="cell">John</td>
      <td role="cell">30</td>
    </tr>
  </tbody>
</table>
This helps screen readers provide a better experience! 🌟
Using Semantic HTML for Better Accessibility 📜
Semantic HTML is your go-to! It gives meaning to your content, making it easier for everyone to understand, including those using assistive technologies. Always prefer semantic tags over generic ones!
Making Tables Keyboard-Navigable ⌨️
Ensure that users can navigate your tables using the keyboard. Avoid overly complicated structures that could hinder accessibility.
15. Advanced Table Features with CSS and JavaScript ⚙️
Using JavaScript to Add Interactive Table Features 🔥
JavaScript can supercharge your tables! Add features like sorting, filtering, and searching for a dynamic user experience.
Sorting, Filtering, and Searching Data Inside Tables 🔍
You can create a search bar that filters table rows based on user input. Here’s a simple example:
Example:
<input type="text" id="searchInput" onkeyup="filterTable()" placeholder="Search for names..">

<script>
function filterTable() {
  const input = document.getElementById('searchInput');
  const filter = input.value.toLowerCase();
  const table = document.querySelector('table');
  const tr = table.getElementsByTagName('tr');

  for (let i = 1; i < tr.length; i++) {
    const td = tr[i].getElementsByTagName('td')[0];
    if (td) {
      const txtValue = td.textContent || td.innerText;
      tr[i].style.display = txtValue.toLowerCase().indexOf(filter) > -1 ? "" : "none";
    }
  }
}
</script>
This will let users search through your table easily! 🔎✨
Adding Expandable Rows for More Information 📚
Sometimes, you want to show more details without cluttering your table. Use JavaScript to create expandable rows that reveal more information when clicked!
Example:
<tr onclick="toggleDetails(this)">
  <td>John</td>
  <td>30</td>
</tr>
<tr style="display:none;">
  <td colspan="2">More details about John...</td>
</tr>

<script>
function toggleDetails(row) {
  const nextRow = row.nextElementSibling;
  nextRow.style.display = nextRow.style.display === "none" ? "" : "none";
}
</script>
This makes your table interactive and user-friendly! 🌟
Highlighting and Animating Table Content with JavaScript 🎨
Add some flair to your tables by highlighting rows on hover or animating content changes with JavaScript.
Example:
document.querySelectorAll('tr').forEach(row => {
  row.addEventListener('mouseenter', () => {
    row.style.backgroundColor = '#f0e68c'; // Highlight on hover
  });
  row.addEventListener('mouseleave', () => {
    row.style.backgroundColor = ''; // Reset
  });
});
CSS Grid and Flexbox for Modern Table Design Alternatives 🌐
Consider using CSS Grid or Flexbox for more modern and responsive table layouts! These techniques allow for more flexibility in design.
.table {
  display: grid;
  grid-template-columns: repeat(3, 1fr); /* Creates three equal columns */
}
Conclusion 🎉
Final Thoughts on HTML Tables: Versatility in Web Design 💻
HTML tables are incredibly versatile! They allow you to organize data in a structured way, making it easy for users to understand information quickly.
Key Takeaways: When to Use and When to Avoid HTML Tables 🗝️
- Use tables for displaying tabular data like schedules, lists, or financial reports.
- Avoid tables for layout purposes; use CSS for design instead!
Summary of Advanced Techniques Discussed 📜
We’ve covered a lot! From mastering colspan and rowspan to ensuring accessibility and creating interactive tables, you now have a solid foundation for working with HTML tables.
Encouraging Experimentation with Table Styles and Features 🌈
Don’t be afraid to experiment! Try different styles, add interactive features, and see what works best for your projects. Let your creativity flow! 🎨✨
FAQs
1. What is an HTML table used for?
It is used to organize and display data in rows and columns on a webpage. It helps in presenting structured information, like charts, comparisons, or tabular data, in an easily readable format on a webpage.
2. Can I style HTML tables using CSS?
Yes! You can use CSS to style HTML tables. You can adjust borders and spacing and even add background colors and hover effects, CSS makes your tables more visually appealing and beautiful.
3. How can I make my HTML tables responsive for mobile?
You can use media queries or you can also use responsive units like percentage to write width and height.
4. What are <td> and <th> tags in HTML tables?
<td>tag defines a table data cell, which holds the actual content.<th>tag defines a header cell, It is typically bold and centered to indicate column or row headings.
5. How can I merge cells in HTML tables?
You can merge cells horizontally using the colspan attribute in the <td> tag and vertically using the rowspan attribute. This is useful for creating more complex table layouts like calendars or schedules.

