You will find a lot of documentation about CSS and many videos on YouTube. But I will try to explain CSS with a different approach. First, we will discuss the topic, then I will provide a code and if possible I will also provide images that will make it easy for you to understand the properties.
So let’s get started!
CSS stands for Cascading Style Sheets and is the soul of web design. It is used to control your web page’s look and feel. In this tutorial, you will get an overall understanding of CSS syntax, selectors, ways through which CSS can be added, and comments.
Table of Contents
CSS Introduction:
CSS means Cascading Style Sheets. It is a language used to control the styling and layout of a web page. Using CSS, you can style HTML elements— color, font, spacing, positioning, etc. In developing very nice-looking, cleanly structured Web pages, CSS is used.
Key Benefits:
- Consistency: Apply the same style rules across multiple pages.
- Separation of Concerns: This allows one to separate the structure of HTML from the style, which improves the maintainability and updating of designs.
- Flexibility: It offers flexibility in changing layouts and designs without touching the HTML structure.
Example of a Simple CSS File:
/* styles.css */
body {
    font-family: Arial, sans-serif;
    line-height: 1.6;
}

h1 {
    color: #333;
}

p {
    color: #666;
}
Syntax of CSS:
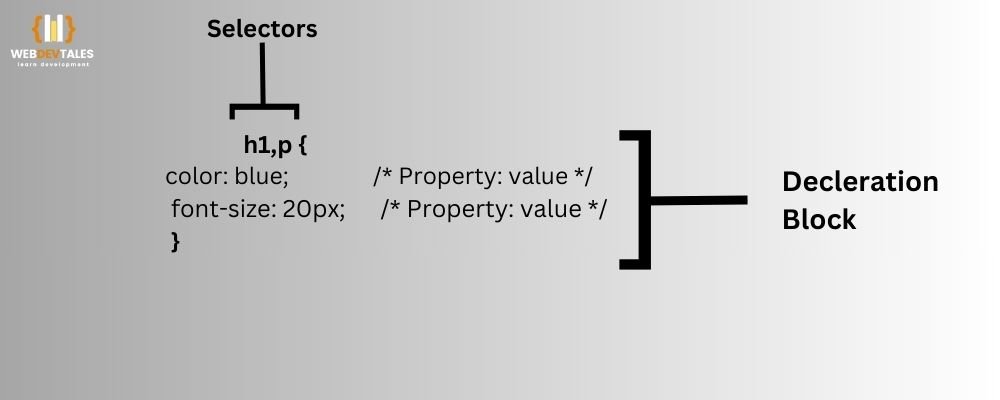
The CSS syntax is quite simple. It comprises only two elements: selectors and declaration blocks. The basic syntax is important to understand if one is to write proficient CSS rules.
Selectors: They are used to target HTML elements to apply CSS. There can be one or more selectors.
Declaration Blocks: They contain the styles you want to apply. They are wrapped in curly brackets “{}” and consist of properties and values.
What is Property?
Properties are generally what a user will think of as parts of an HTML element that they wish to style or change in CSS. Properties answer the question, “What part of the element’s appearance do you want to control?” For example, you might want to change an element’s text color, its background color, its font size, or even the margin around it. Each of these corresponds to a different property. Properties are written as keywords in CSS code.
Example:
p {
  color : blue;
}
In this “color” is the property, while “blue” is its value.
What is Value?
A value in CSS refers to the specific setting or definition you will assign to any property. It determines how that particular property should be applied to the elements. They usually are in the form of colors, measurements, keywords, and other units that make sense for the property. The value always comes after the property and is separated by a colon.
Example:
p {
color: blue;
}
In this “blue” is the value applied to the “color” property.

CSS Structure:
selector {
    property: value;
}
- Selector: It targets the HTML element that you want to style.
- Property: Defines which aspect of that element you want to change.
- Value: Defines a value for the property.
Example:
/* Selector: h1 */
h1 {
    /* Property: color */
    color: blue; /* Value: blue */
}
Explanation:
- “h1” is a selector targeting all <h1> elements.
- “color” is a property that changes the color of the text.
- “Blue” is a value that will be applied to the property color.
Selectors:
Selectors in CSS allow us to target HTML elements to apply styles. There are types of selectors, which serve different purposes.
Types of Selectors:
There are the most used types of selectors in CSS.
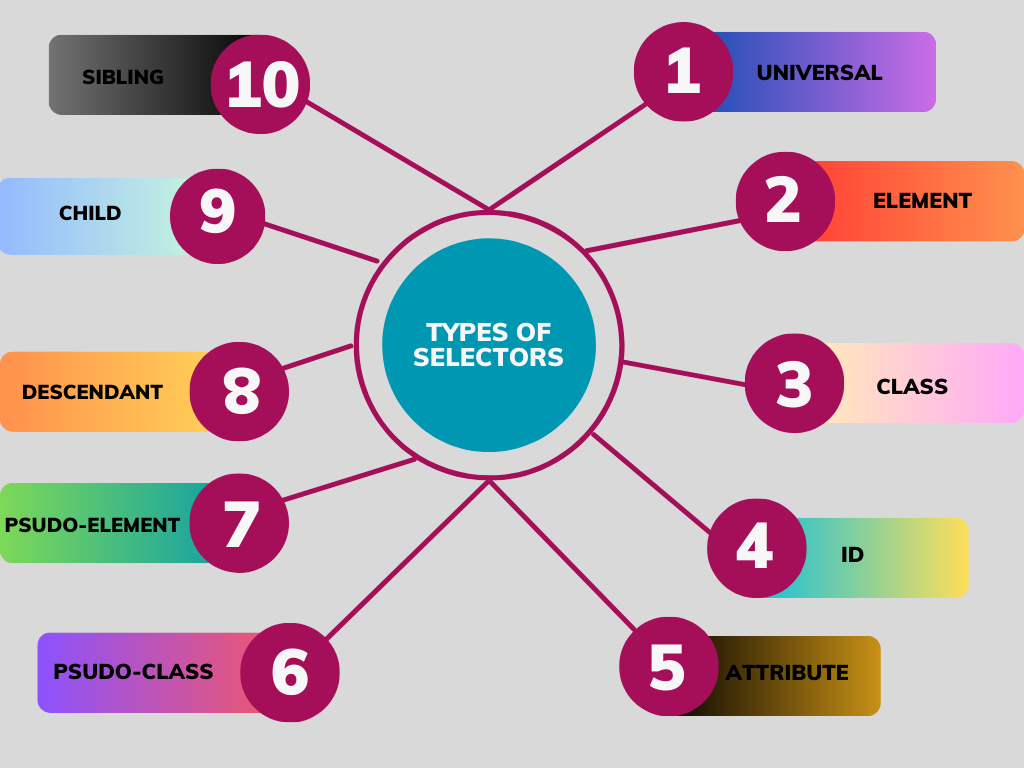
1. Universal Selector:
- This selects all the elements on a page.
- The universal selector is the asterisk (*) that applies a style to every element within the document.
- It’s quite useful to have overall styles selector, or even reset the default browser styles, but use it carefully since it can affect performance and may override other more specific rules.
/* Targets all elements on the page */
* {
    margin: 0;
    padding: 0;
    box-sizing: border-box;
}
2. Element Selector:
- Selects all occurrences of a particular HTML element. For instance, if you apply an element selector to the <p> tag, all the paragraphs on the page will show that styling.
- It’s the simplest type of selector and turns out to be pretty useful in styling some HTML elements universally.
p {
    color: green;
}
3. Class Selector:
- Selects elements with a given class attribute.
- Class selectors always start with a dot (.) and can, therefore, be used with several elements. Thus, you would be able to have the same class applied to many different elements that apply the very same styling to those elements.
- The class selector allows huge flexibility by enabling you to style one group of elements without affecting any other element type.
.highlight {
    background-color: yellow;
}
4. ID Selector:
- Matches an element with a given ID attribute.
- ID selectors are unique and should be used to style only one element per page.
- They are declared using a hash (#).
- As IDs are unique within a page, this selector has rather high specificity, and hence its styles would override others in case of a conflict.
#unique {
    font-size: 20px;
}
5. Attribute Selector:
- Selects elements based upon whether the target element has an attribute or its value.
- Attribute selectors permit a fine degree of control by selecting elements which have specified attributes or attribute values.
- This proves useful for styling form elements, links and many other elements with particular attributes.
input[type="text"] {
    border: 1px solid gray;
}
6. Pseudo-Class Selector:
- Selects elements that are in a certain state or position.
- Pseudo-classes style elements on the basis of their state. For example, when a user hovers over a link, or when an element is the first child of its parent.
- They are preceded by a colon (:). Pseudo classes can be used to apply styles dynamically depending on the user actions or document structure.
h1{
    color: black;
}

h1:hover {
    color: red;
}
For example, in this code, you can see that when you will hover over the h1, its color state will be changed from default black to red.
7. Pseudo-Element Selector:
- Selects a portion of an element or adds content before or after an element.
- Pseudo-elements should be used to style or add content to a specific part of an element.
- They have double-colon precedence (::). Common uses are to add decorative content or style parts of text, like the first line or first letter of a paragraph.
p::first-line {
    font-weight: bold;
}
What is a Pseudo-Element?
A pseudo-element is used to style a specific part of an element or to insert content into an element. They are typically used to style:
- The first line of text or the first letter of text.
- Insert content before or after an element.
- Style portions of content differently, like every other line.
Pseudo-elements are denoted with a double colon (::) to distinguish them from pseudo-classes, though older browsers also support the single colon (:).
Common Pseudo-Elements:
- ::before – Inserts content before an element.
- ::after – Inserts content after an element.
- ::first-line – Styles the first line of a block of text.
- ::first-letter – Styles the first letter of a block of text.
- ::selection – Styles the part of an element that’s been highlighted by the user
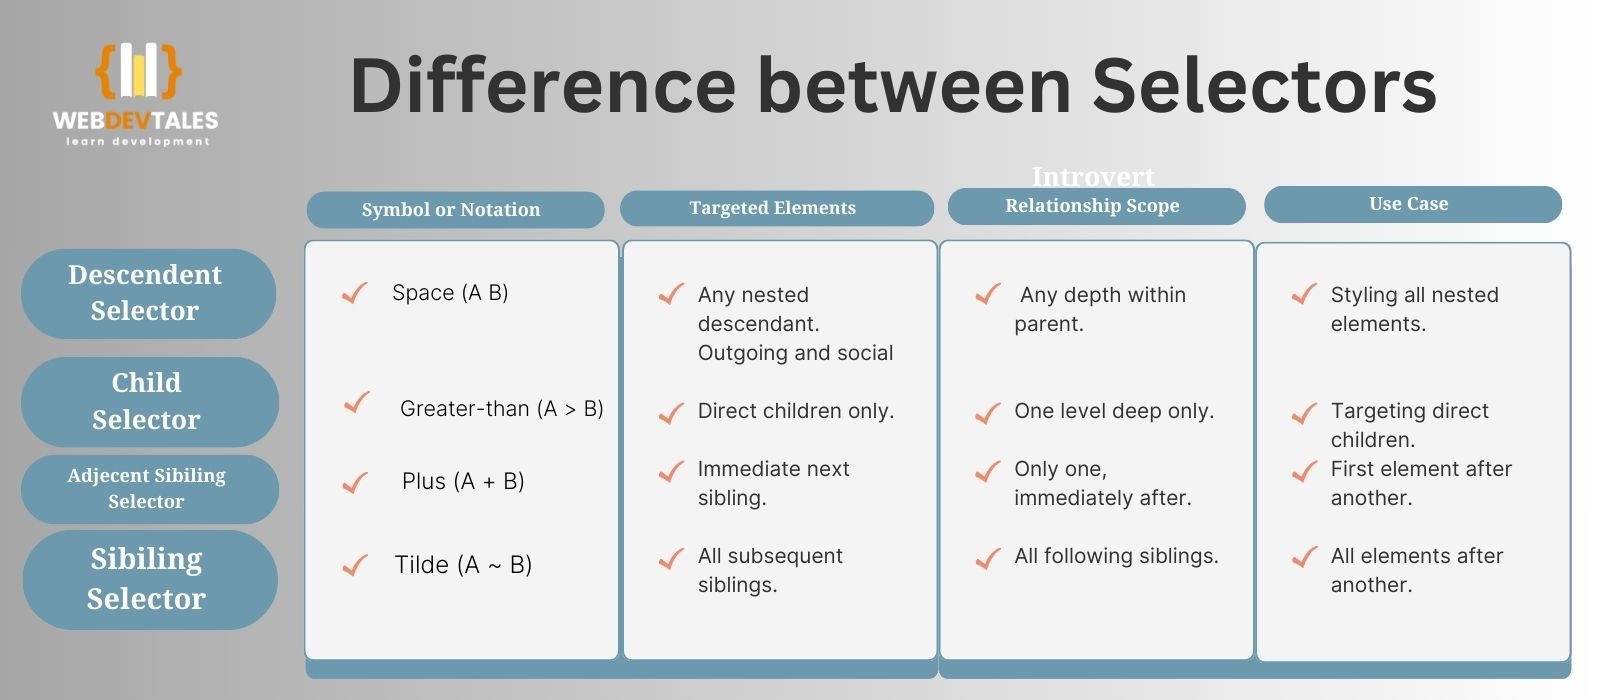
8. Descendant Selector:
- Selects elements that are descendants of a given parent element.
- This selector applies styles to elements that are descendants of a specified parent, regardless of their depth.
- This is quite useful for styling elements based on their hierarchical position within the DOM.
/* Targets <span> elements inside <div> elements */
div span {
    color: purple;
}
9. Child Selector:
- Selects elements that are direct children of a specified parent element.
- This selector applies the styles to those elements that become immediate children of a given parent.
- This is quite useful when targeting certain elements in a container and leaving deeper nested elements alone.
/* Targets <li> elements that are direct children of <ul> */
ul > li {
    list-style-type: square;
}
10. Adjacent Sibling Selector:
- Selects an element that comes directly after another specified element.
- The sibling selector applies styles to the element right after another specified element, thus enabling styles on the basis of the proximity of tags.
/* Targets <p> elements that immediately follow an <h2> */
h2 + p {
    margin-top: 0;
    color: orange;
}
11. Sibling Selector:
- Selects all elements that come after a specified element.
- The general sibling selector applies the styles to all elements sibling to a specified element and which come after in the hierarchy of the DOM.
- This can also be used in styling multiple elements sharing a common predecessor.
/* Targets all <p> elements that are siblings of an <h2> */
h2 ~ p {
    color: brown;
}
Ways of Adding CSS
There are three ways to add CSS.

Inline Method:
Applied in the line to an element in the HTML file using the style attribute within the tag of the element. This is useful for quick, one-off styles but generally not recommended for larger projects.
Pros:
- Quick Application: It is convenient to apply any style right in the tags used in HTML.
- Overrides Other Styles: Inline CSS is the most specific; it comes above external / internal CSS.
- No External Files Needed: No need to link any external stylesheets for styling, as all is embedded within the very HTML itself.
Cons:
- Maintenance Difficulty: Difficult to manage as styles are spread out in the HTML file hence creating a larger and complex HTML file.
- Poor Reusability: There are also limitations to the styles in that the same style cannot be used for two different elements or on web pages.
- Performance Issues: These cause more page size and loading times if the use of cookies is taken to extremes.
- Separation of Concerns: Overwrites HTML tags with CSS, which is against the principle of having a clean and easy-to-read HTML.
<p style="color: blue; background-color: yellow;">This is a styled paragraph.</p>
Internal Method:
It is defined inside the <style> tags inside the head section of the HTML document. This method is useful in styling a single document, and the CSS rules remain inside the document.
Pros:
- Scoped Styling: It may be useful to understand that styles are document-based and not template-based which means a relational database of external documents is not necessary.
- No External Requests: Reduced space of external style sheet to be downloaded by the browser thus faster first-time loading time.
- Easy Overrides: The possibility to override styles defined outside of the project for one or several pages is less complicated.
Cons:
- Not Reusable: A style is tied strictly to one HTML document in order to be applied on multiple pages.
- Increased Load Time: When the styles are elaborate, the HTML file size will be considerably huge.
- Limited Control: This may be less efficient if one is dealing with a large project with so many pages.
- Less Performance Optimization: Internal duplication can be witnessed when multiple in-house page styles are utilized hence causing redundancy of work.
<head>
    <style>
        body {
            background-color: #f0f0f0;
        }
        p {
            color: green;
        }
    </style>
</head>
External Method:
This is linked to an HTML document using the `<link>` element. In this way, this method is preferred to have the same styles on many pages and is ideal for larger projects.
Pros:
- Reusability: Some of these include; Styles that can be used many times making it easier for designers to maintain standard designs for different pages.
- Separation of Concerns: This is beneficial in that it helps to keep the HTML and CSS separate, which results in cleaner code and which is easier to maintain.
- Improved Performance: CSS is cached in a browser so that subsequent pages open faster in a browser.
- Scalability: Advantageous in big projects where there is overall control of style.
Cons:
- Additional HTTP Requests: Page loading is slower due to the fact that there is a second request to download an external CSS file.
- Dependency on External Files: In some cases, where the stylesheet could not load, the webpage could load sometimes with no application of any styles.
- Complex Debugging: Debugging styles can be the more difficult as they are not in the HTML file so if the styles are not working, one has to know where to look.
- Initial Load Delay: Styles may not be applied until the CSS file is fully loaded which means that the user is confronted with a page full of unstyled content, the FOUC.
<head>
    <link rel="stylesheet" href="styles.css">
</head>
Best Practice: External CSS should be used for big websites. Internal CSS may be used for the styles applied to a single page only. Inline CSS should never be used because it is not consistent.
CSS Comments
Comments in CSS are used to put a note or explanation in your stylesheet. It helps to document the code for readability to any person working on that code sometime later.

Syntax for Comments:
/* This is a single-line comment */

/*
   This is a multi-line comment
   which can span multiple lines.
*/
Examples:
Single-Line Comment:
/* Set the background color for the body */
body {
    background-color: #f0f0f0;
}
Multi-Line Comment:
/*
  This section styles the main header and footer.
  It includes background colors and font settings.
*/
header {
    background-color: #333;
    color: white;
}
footer {
    background-color: #333;
    color: white;
}
Usage Tips:
Comments should be used to explain complicated or unintuitive code. Avoid over-commenting because comments are useful only when they provide value, thus enhancing clarity.
NOTE: This is just the start, we will cover more topics in our next blogs. More about CSS is discussed in our next blog.
Quiz: Do you want to test your knowledge? Check this quiz.
CSS: Programs with Styles
One of the cores of Web Development, CSS (Cascading Style Sheets), allows any web developer to create attractive, responsive websites. It allows the separation of content—in most cases, represented by HTML—from the design represented in CSS, and gives the incentive of clean and maintainable code. For a detailed guide on how to work with styles, you can refer to here. Need to see how CSS works with HTML? Check our HTML & CSS tutorial. Want more? Read up on the advanced layout techniques provided by the CSS Grid system.
FAQs:
Q. What are the 5 CSS selectors?
Universal Selector, Type Selector, Class Selector, ID Selector, Attribute Selector, Descendant Selector, Child Selector, Adjacent Sibling Selector, General Sibling Selector, Grouping Selector, Pseudo-class Selector, Pseudo-element Selector.
Q. Which selector is best in CSS?
Actually, you can’t say which selector is best. As every selector has its purpose and its value. But in different situations a specific situation there can be a best selector.
Like …..
- Class Selector is best when you want to apply the same style to different elements, You can do this by giving the same class name to these elements.
- ID Selector is best when you want to ensure that a style is applied to only that selected element.
- Pseudo-class Selector is best when you want to target the state of an element.
- Pseudo-element Selector is best when you want to target a specific part of an element. For example,
::beforecan insert content before an element’s content.
Just like this, every selector is best in a different scenario.
Q. Which CSS is preferred?
The choice ultimately depends on the project’s size, complexity, and the team’s preferences.
For most projects, External CSS is preferred due to its maintainability, separation of concerns, and reusability. For larger projects or specific needs, combining methods such as using a preprocessor with external CSS or adopting CSS-in-JS for component-based projects might be more suitable.
Q. Which CSS is the fastest?
Inline CSS is the Fastest because it is applied directly within the HTML. So inline CSS avoids additional HTTP requests. And that is why its loading time is also minimal.
Q. Is CSS very difficult?
First, it depends on you. If you have an interest in styling, then it isn’t much difficult for you. Still, it can be challenging due to complex layouts, cross-browser compatibility, and advanced features, but basic styling and simple layouts are generally straightforward. With practice and good resources, CSS becomes more manageable and easier to use effectively.


Wao very informative
interesting facts about CS lS
Great knowledge for beginners